1. Create a Virtual Machine
Follow these steps to provision a VM for Flux ArcaneOS. While this example uses Proxmox, the same principles apply to any hypervisor supporting UEFI and TPM 2.0.
Make sure the VM configuration includes:
- UEFI boot mode
- TPM 2.0 (virtualized if on a VM)
- Sufficient CPU, RAM, and SSD based on FluxNode requirements
VM Configuration Overview
| Category | Setting | Value / Guidance |
|---|---|---|
| General | VM ID | Any unique numeric ID |
| Name | Descriptive (e.g., FluxNode-Cumulus) | |
| OS | ISO Image | Your downloaded ArcaneOS ISO |
| System | BIOS | OVMF (UEFI) |
| EFI Disk | Enabled; choose storage location | |
| Pre-Enroll Keys | Disabled (→ puts UEFI in setup mode so you can load your own SPK) | |
| Add TPM | Enabled; select v2.0 and storage | |
| Disks | Disk Size | 220 GiB (Cumulus) / 440 GiB (Nimbus) / 880 GiB (Stratus) |
| CPU | Sockets / Cores / Threads | 2 C / 4 T (Cumulus) / 4 C / 8 T (Nimbus) / 8 C / 16 T (Stratus) |
| Type | host (ensures AVX support; leaving default may disable it) | |
| Memory | RAM | 8 GB (Cumulus) / 32 GB (Nimbus) / 64 GB (Stratus) |
| Network | Firewall | Disabled |
⚠️ Note: If “Pre‑Enroll Keys” is left enabled, you’ll see a UEFI warning on first boot.
Detailed Step-by-Step Configuration
1. Start the VM Creation
- In Proxmox, click “Create VM”.
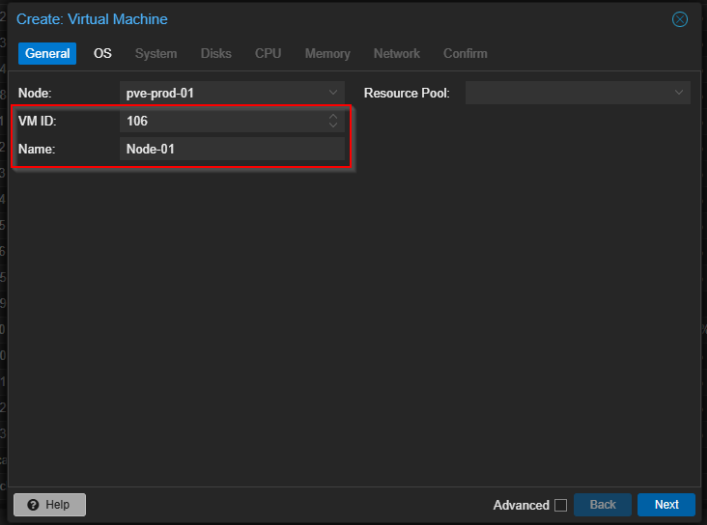
2. General Tab
- VM ID: Pick any unused numeric ID (e.g.
101). - Name: Enter something descriptive, e.g.
FluxNode-Cumulus. - Click Next.
2. OS Tab
- ISO Image: Select the ArcaneOS ISO you downloaded (
Flux-ArcaneOS-YYYYMMDD.iso). - Leave other options at their defaults.
- Click Next.

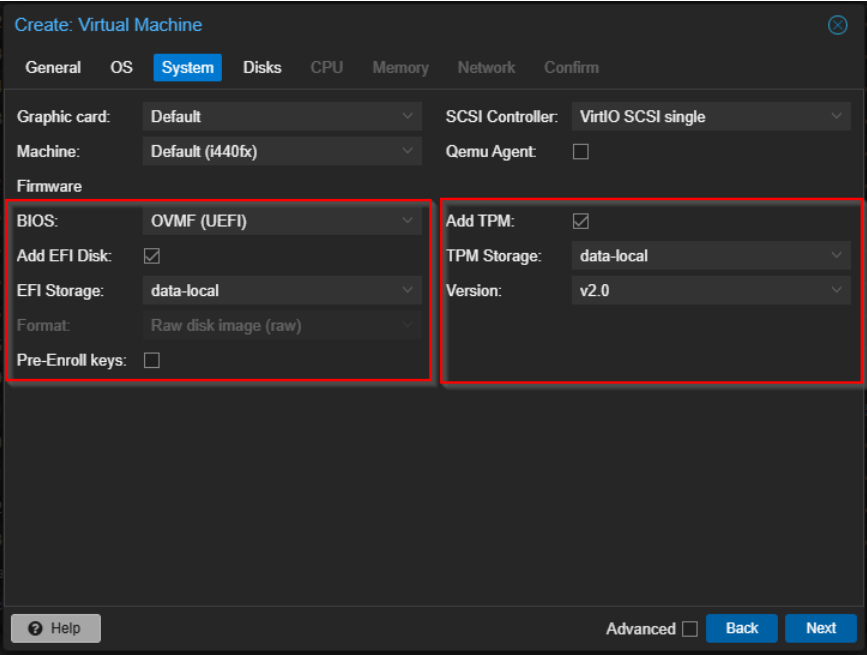
3. System Tab
- BIOS: Choose OVMF (UEFI).
- EFI Disk:
- Check “Add EFI Disk.”
- Select your storage volume (e.g.
local-lvm).
- Pre-Enroll Keys:
- Uncheck this box—this puts UEFI into setup mode so you can later import your Flux SPK without warnings.
- TPM:
- Check “Add TPM.”
- For Version, choose 2.0.
- Select a storage location (e.g.
local-lvm).
- Click Next.
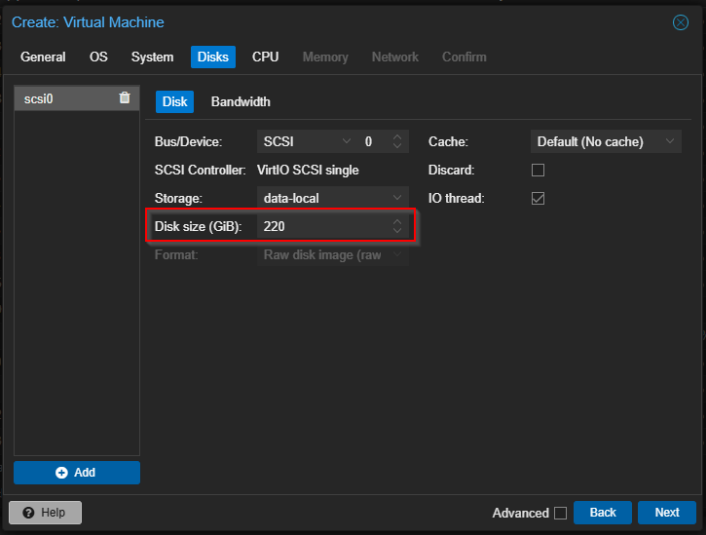
4. Disk Tab
- Disk Size:
- Enter tier-specific sizes:
- Cumulus:
220 GiB - Nimbus:
440 GiB - Stratus:
880 GiB
- Cumulus:
- Enter tier-specific sizes:
- Leave other options at their defaults.
- Click Next.
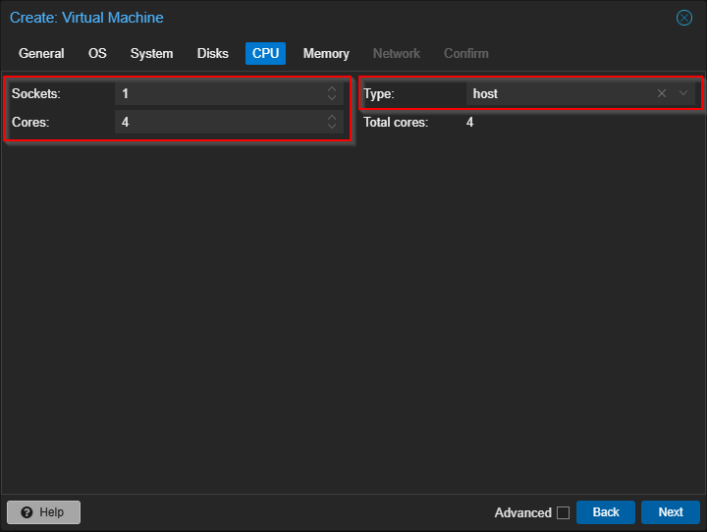
5. CPU Tab
- Sockets / Cores / Threads: Configure according to your FluxNode tier requirements
- Cumulus: 1 Sockets, 4 Cores
- Nimbus: 1 Sockets, 8 Cores
- Stratus: 1 Sockets, 16 Cores
- Type: Set to host to preserve AVX and other instruction‑set features.
- Click Next.
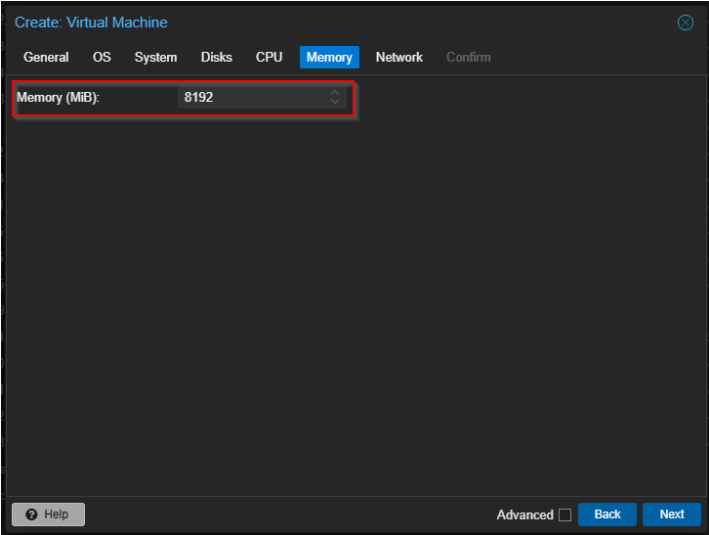
6. Memory Tab
- Memory (MiB): Allocate RAM based on FluxNode requirements:
- Cumulus:
8000 - Nimbus:
32000 - Stratus:
64000
- Cumulus:
- Click Next.
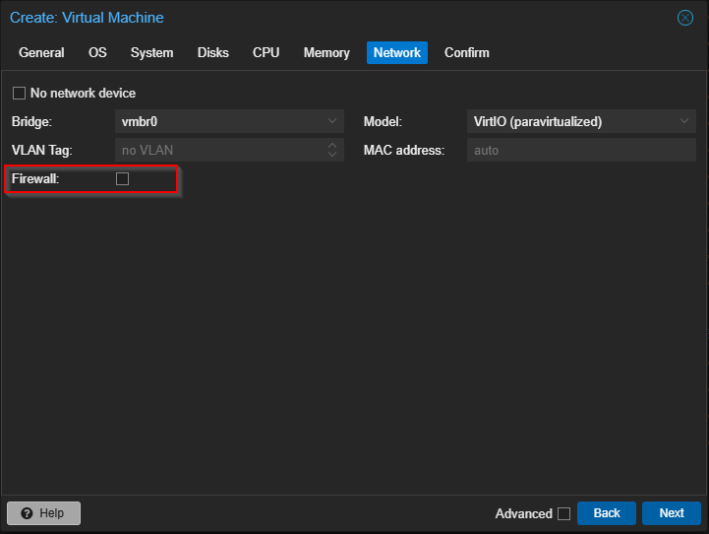
7. Network Tab
- Firewall: Uncheck to allow UPnP/DMZ passthrough.
- Leave the bridge and model at defaults (e.g.
vmbr0,virtio). - Click Next.
8. Confirm Tab & Create
- Review every setting in the Summary view.
- Click Finish to commit and create the VM.
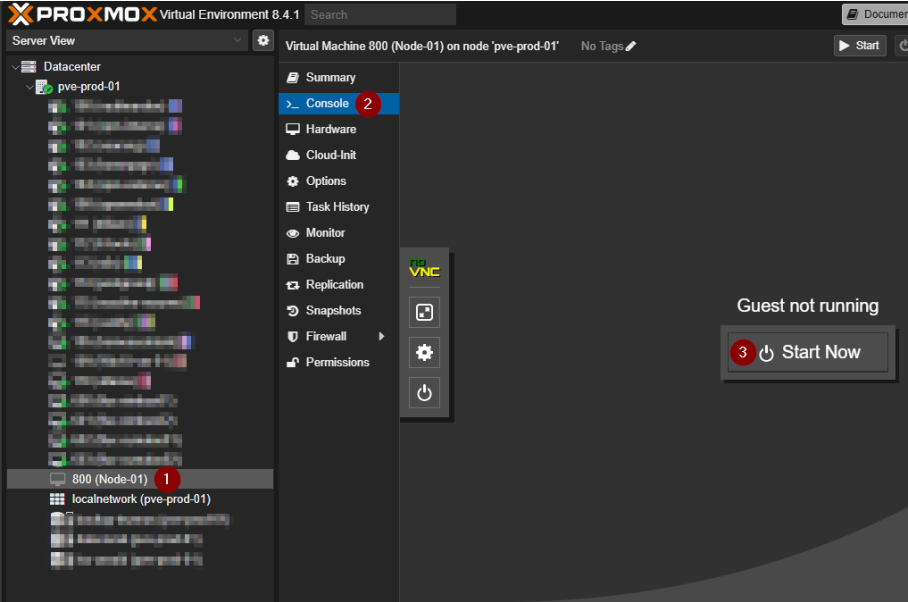
9. Start & Connect
- In the Proxmox VM list, select your new VM (
FluxNode-Cumulus). - Click Start (green ▶ icon).
- Switch to the Console tab—ArcaneOS’s graphical installer should boot automatically.
Tips & Troubleshooting
- If ArcaneOS reports a “Missing TPM” or “UEFI not in setup mode” error, revisit the System tab and confirm Pre‑Enroll Keys is disabled and TPM 2.0 is enabled.
- The “host” CPU type is critical: without it, you’ll see warnings about missing AVX instructions in the installer.
- Use the Console tab’s toolbar to send Ctrl+Alt+Del or to change boot devices if needed.
Why These Settings Matter
- UEFI + TPM 2.0 are required for ArcaneOS’s cryptographic chain of trust.
- “host” CPU type preserves instruction sets (AVX) necessary for miner performance.
- Disabling Pre‑Enroll Keys ensures you can later enroll Flux’s Signed Platform Key (SPK) without UEFI warnings.