Manual Deployment
This guide walks you through launching a custom Kaspa Node on FluxCloud using the Register New App tab.
How To Access
Visit cloud.runonflux.com, sign in, open the Register New App menu.
Overview of Sections
You'll configure all necessary settings across four main sections:
- General
- Geolocation
- Components
- Review
Let’s walk through each tab step by step.
General
The General tab is where you provide general information and configuration settings for your application.
Version:
- Shows you the version of the application specifications
- This is hardcoded and cannot be changed
Application Name:
- Must be at least 3 characters long
- Allowed characters: A–Z, a–z, 0–9
- No spaces or special characters allowed
Description:
- Must be at least 3 characters long
Owner:
- Displays the FluxID associated with your account.
- You can change it to another FluxID to deploy on its behalf.
Contact (Optional):
- Enter a public contact email to receive important notifications (e.g., app expiration)
⚠️ Contacts are publicly accessible via the FluxCloud API
- Use the blue upload button next to the field to upload your contact information to Flux Storage
- This replaces parameters with a storage link (only the link is visible via API, and the content is not accessible)
Instances:
Define how many servers (instances) will run your application
- Minimum: 3 (for redundancy and load balancing)
- Maximum: 100
Period:
Choose your app’s subscription duration
- from 1 week to 1 year
- This is a prepaid, non-refundable period
Static IP (Recommended):
Toggle this ON
Enterprise Application (Not Needed):
Keep Toggle OFF
Geolocation
The Geolocation tab lets you control where your application will be deployed within the global network.
Allowed Locations (Optional):
Specify where your app can be deployed. You can select one or more by clicking the plus icon:
- Continents
- Countries
- Regions
Forbidden Locations (Optional):
Specify where your app can be deployed. You can select one or more by clicking the plus icon:
- Continents
- Countries
- Regions
Component
The Component tab is where you define your application’s container settings, connectivity options, environment variables, and resource requirements.
Component Name:
- kaspad
Component Description:
- kaspad container
Repository Tag:
- kaspanet/rusty-kaspad:latest
Cont. Data
- Mode: None
- /app/data
Environment Variable (Not Needed):
Commands:
Use the "Import from JSON* button and copy paste the below command to it.
- Mainnet:
["kaspad","--yes","--nologfiles","--disable-upnp","--utxoindex","--listen=0.0.0.0:15211"--rpclisten=0.0.0.0:15210","--rpclisten-borsh=0.0.0.0:17210","--rpclisten-json=0.0.0.0:18210"] - Testnet:
["kaspad","--yes","--nologfiles","--disable-upnp","--utxoindex","--testnet","--listen=0.0.0.0:15211"--rpclisten=0.0.0.0:15210","--rpclisten-borsh=0.0.0.0:17210","--rpclisten-json=0.0.0.0:18210"] - In case you use 16GB for RAM Resources, add the string "--ram-scale=0.8" to the command above.
Exposed Port:
- Mainnet:
- 15110
- 15111
- 17110
- 18110
- Testnet:
- 15210
- 15211
- 17210
- 18210
Container Port:
- Mainnet:
- 15110
- 15111
- 17110
- 18110
- Testnet:
- 15210
- 15211
- 17210
- 18210
Custom Domains:
- You can add custom domains, It is mapping to each port seperatly
- For setup instructions, refer to the Custom Domain Setup guide
Hardware Resources:
- Recommended Resources
- CPU: 8 vCores
- RAM: 16,000MB, or 24,000MB RAM
- SSD: 256GB
Review
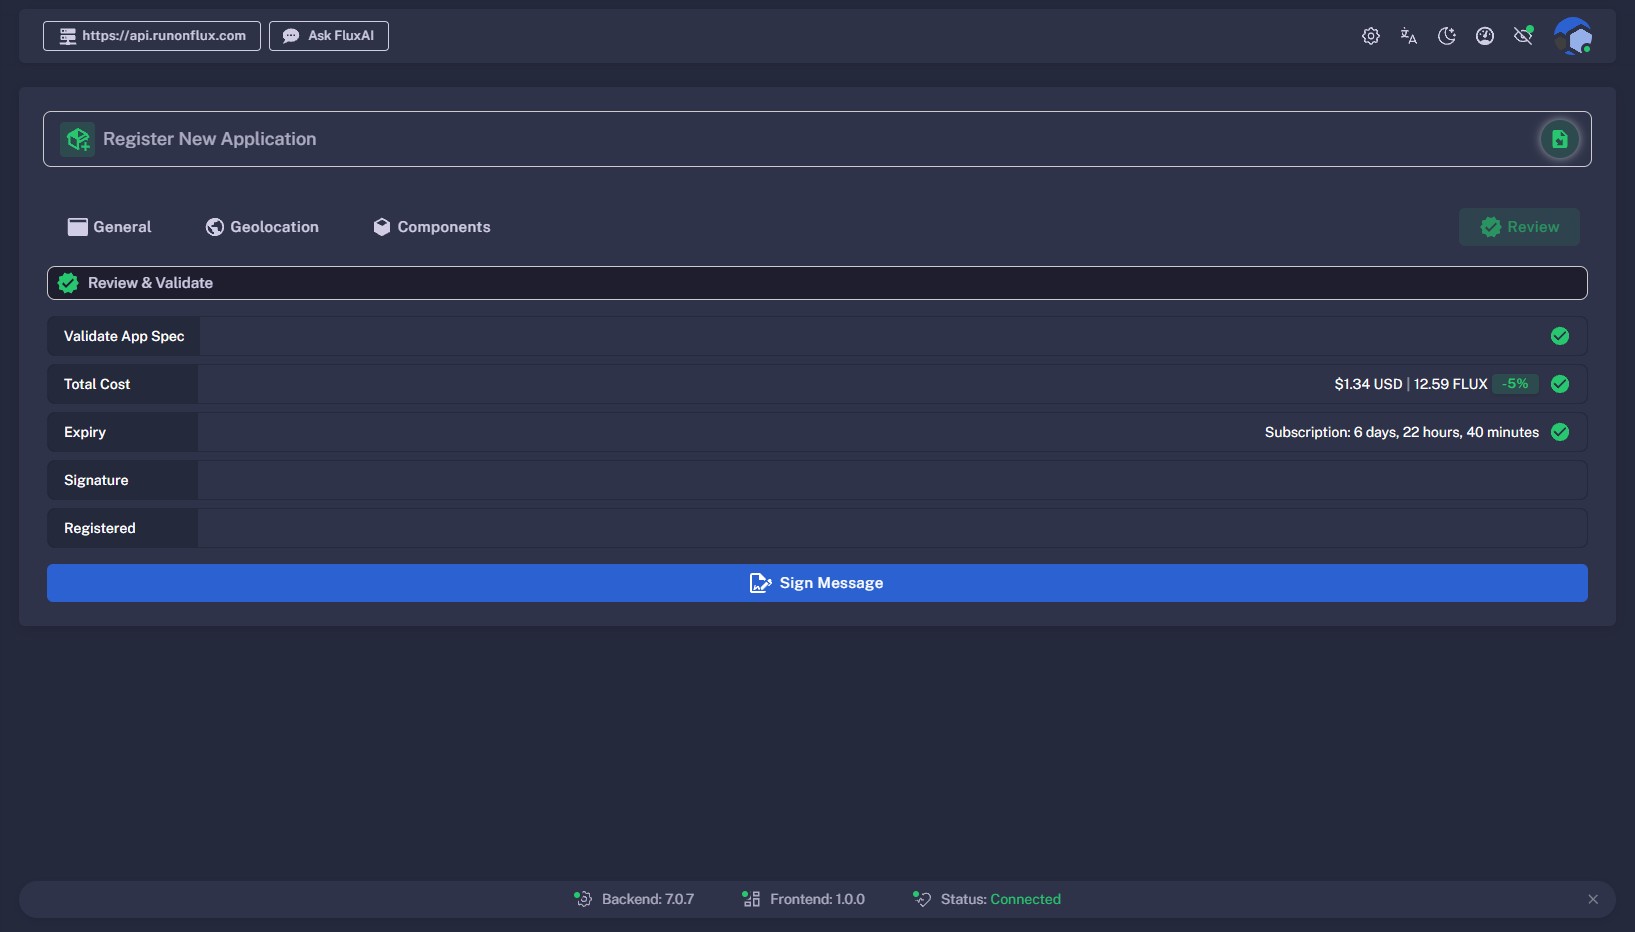
The Review tab is the final step before deploying your application to the Flux network. Once all previous tabs are completed, this page allows you to review and validate all application details.
Review Your Application
After completing your application specifications, click the green Review button to open the Review and Validate screen.
Here, you’ll complete all registration steps required before deployment.
Registration Steps
-
Validate App Specs
Your application specifications will be checked for any errors or inconsistencies.
If issues are found, you’ll be prompted to correct them before running the review again.\ -
Verify Total Cost
If validation is successful, you’ll see the total deployment cost displayed in both USD and FLUX (including a 5% discount when paying with FLUX).\ -
Expiry
View your application’s subscription period or duration of validity.
-
Signature
Once the first three steps are verified (all marked green), click Sign Message and sign using your chosen login method.\ -
Registration
After signing, your application registration will be propagated across the Flux blockchain.\ -
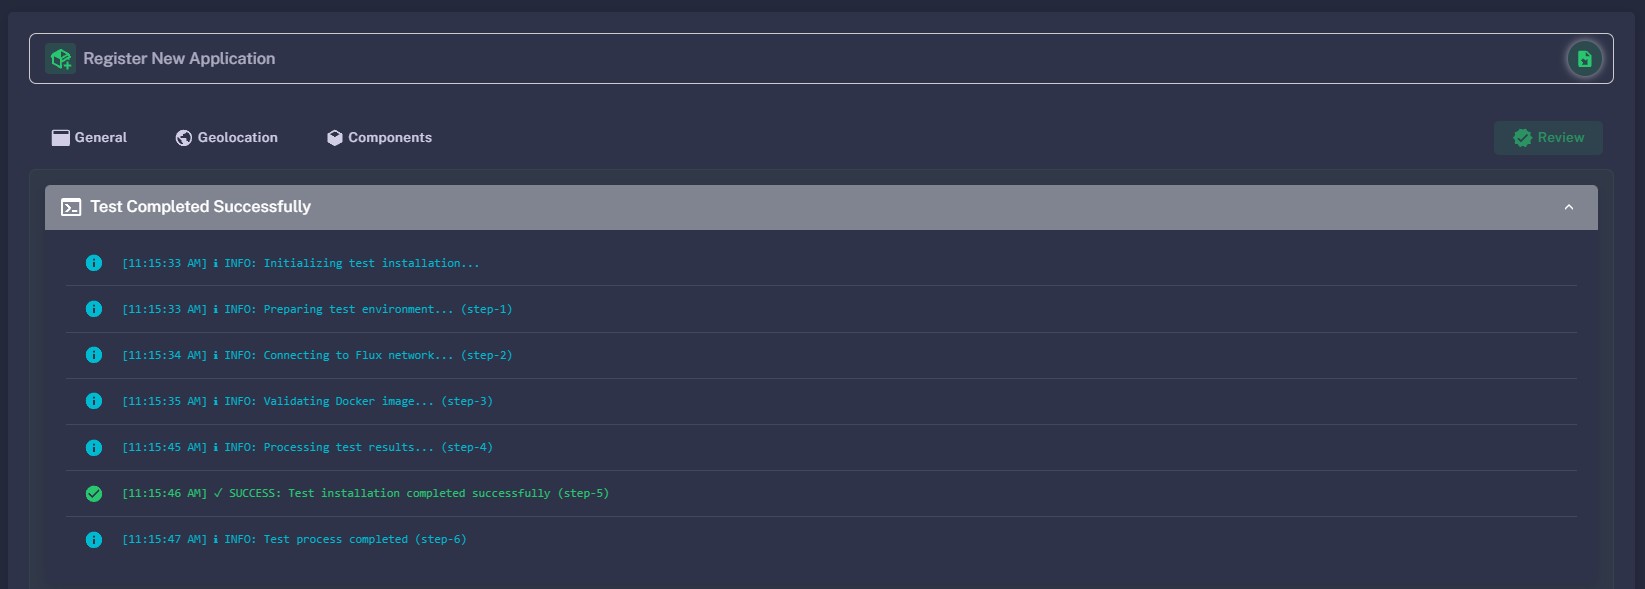
Application Test
Flux will automatically run a short test to deploy your application on test FluxNodes, ensuring the Docker container can be pulled and launched successfully.
You can expand this section to view test details.
- Pay for Your Application
Once registration and testing are successful, payment options will be unlocked.
You must complete payment within 30 minutes to proceed with deployment.
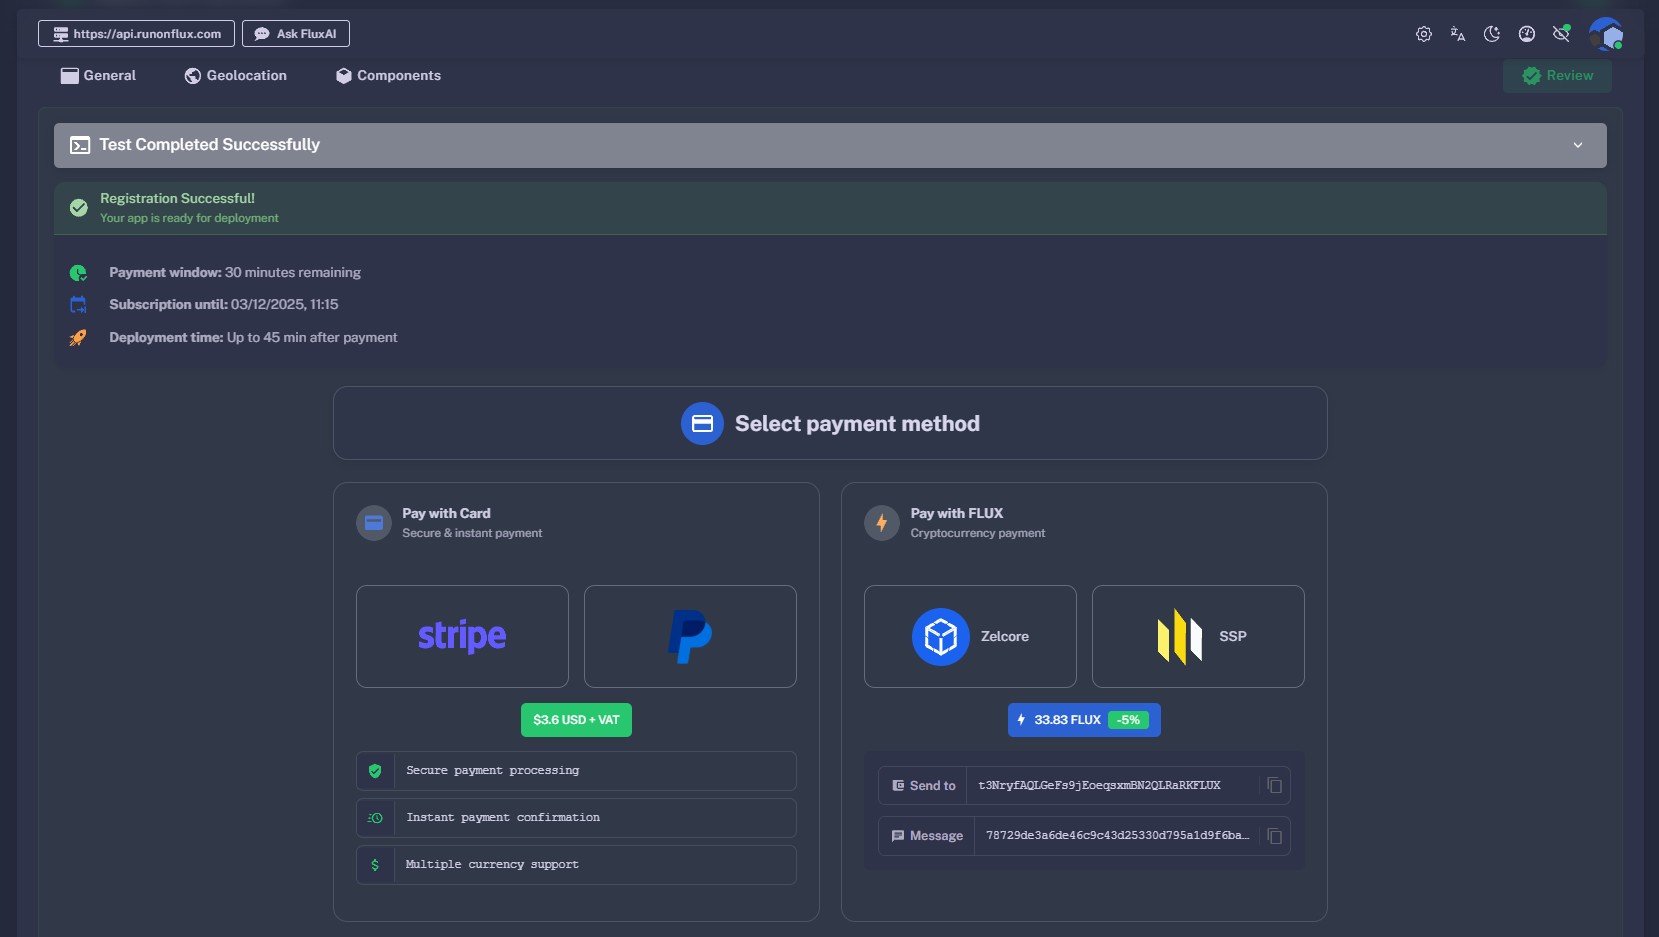
Payment Options
- Stripe – Credit or Debit Card
- PayPal
- FLUX – Receive a 5% discount when paying with FLUX.
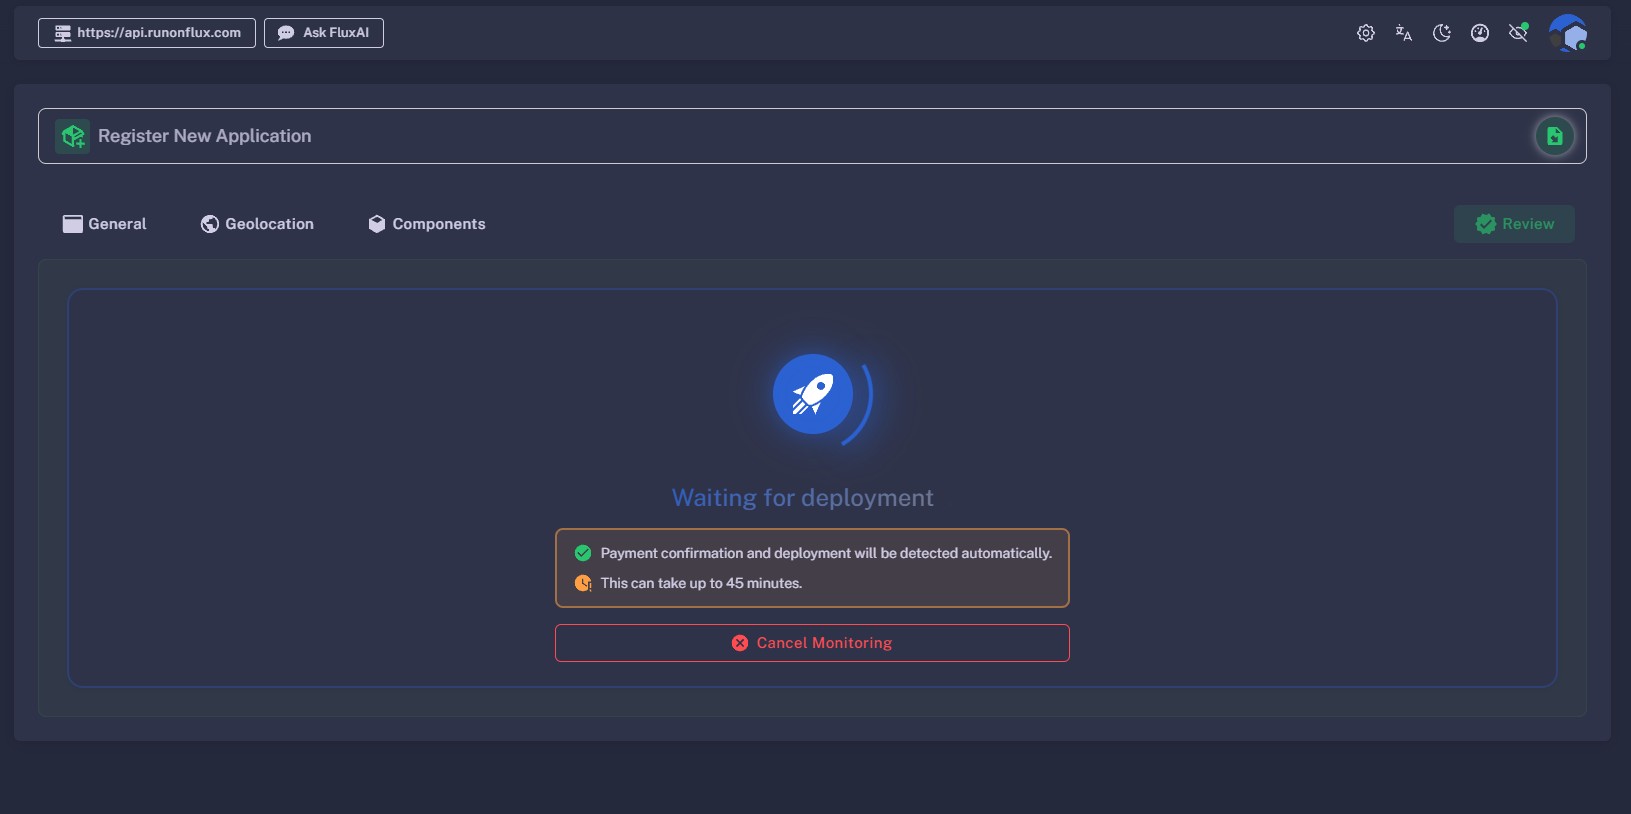
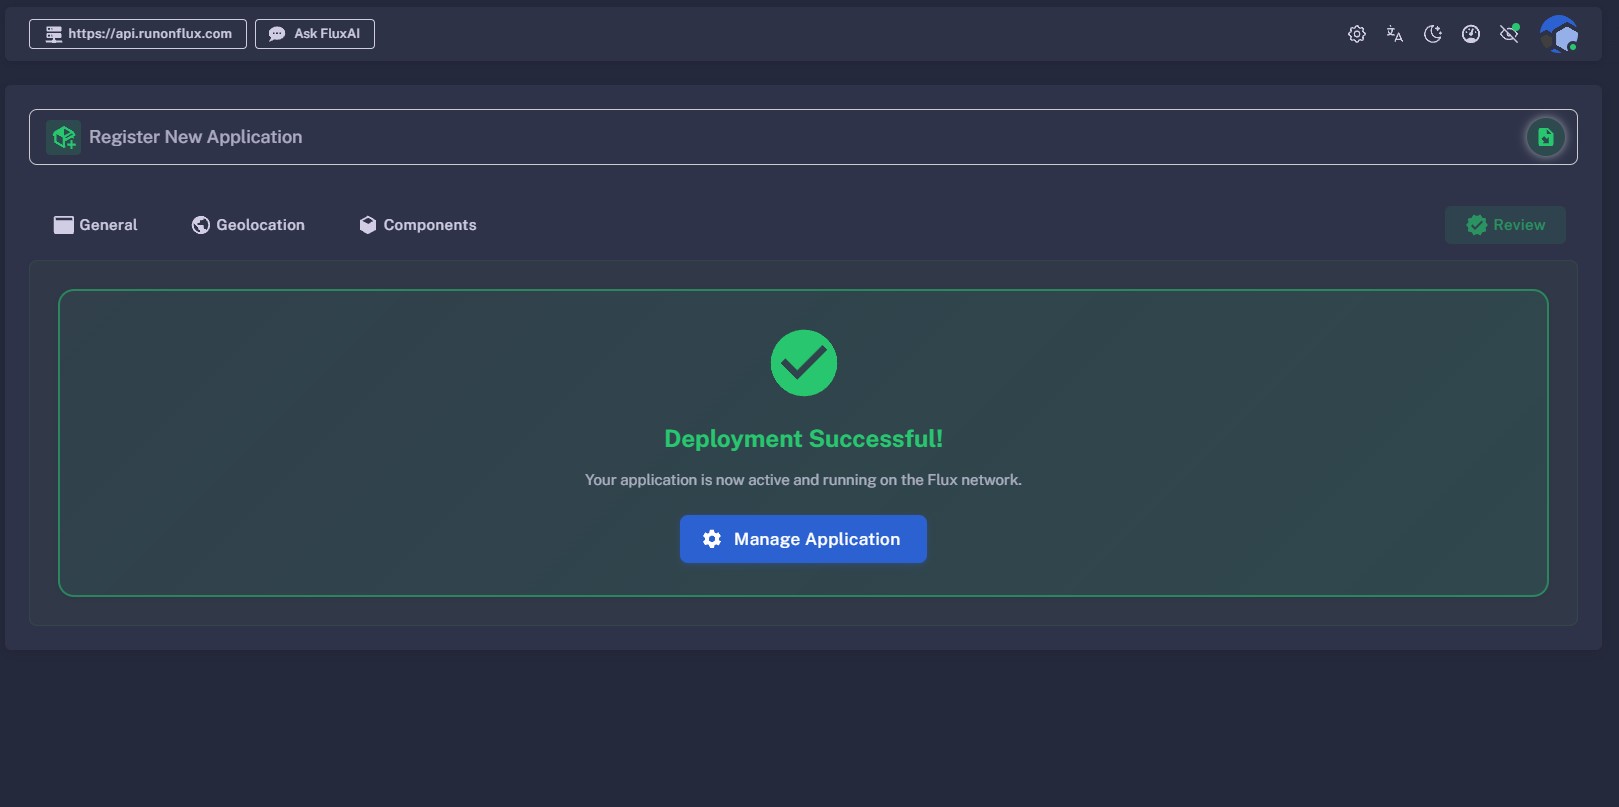
Payment is monitored automatically. Once confirmed, your application will be deployed, and a blue Manage button will appear—directing you to your application’s management panel.
Learn more about managing your application in the Active Apps section.