Kaspa Nodes
This guide walks you through the process of deploying, managing, and connecting to a Kaspa Node (Mainnet or Testnet) using FluxCloud. Whether you’re setting up a new node or maintaining an existing one, this page provides step-by-step instructions and key details for a seamless experience.
How To Install a Kaspa Node
Overview
Deploying a Kaspa Node on FluxCloud allows you to participate in the Kaspa network with full redundancy, automated failover, and blockchain-backed registration — all managed from an easy-to-use web interface.
Steps
- Access FluxCloud
- Visit cloud.runonflux.com and sign in or create an account.

- Find Kaspa Node
- Open the Marketplace → Applications menu tab.
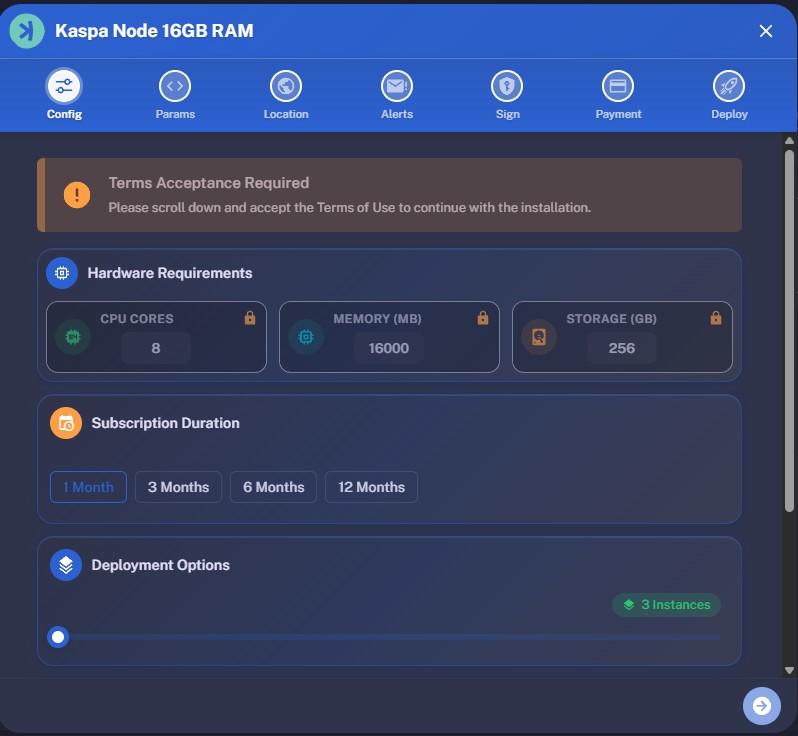
- Search for Kaspa and select the KaspaNode for Mainnet, or KaspaTestnet for Testnet.
- Choose 16GB or 24GB depending on your budget, and usage of the node.

- Choose Subscription & Instances
- Select your preferred subscription duration (starting at $27.20 per month).
- Choose the number of instances (servers running your Kaspa node).
- Agree to the Terms of Service, then click the blue Continue arrow at the bottom.
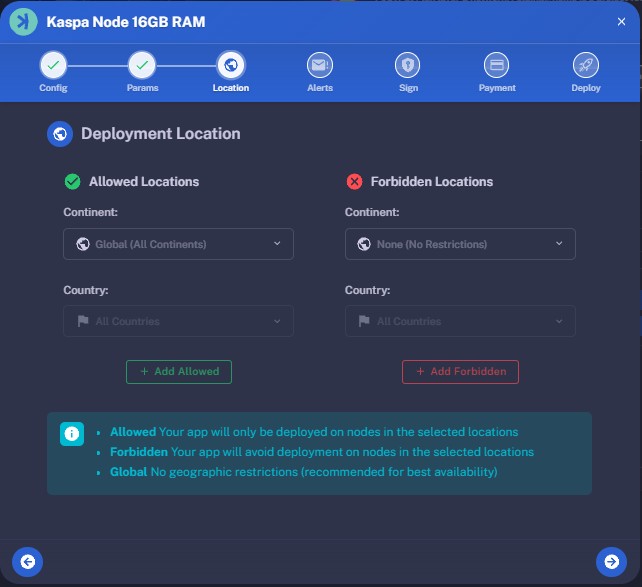
- Specify Your Deployment Location [Optional]
- Specify if you want to only allow certain geolocations to spawn your kapsa node or forbidd certain geolocations.
- By default your Kaspa node will be deployed on random servers globally .
- Supported are continent, and additionally Country selection.
- Save your selection by clicking the + Add Allowed/Forbidden button.
- Continue using the blue Arrow at the bottom.
- Email Notications [Optional]
- Enter your email address to receive notifications about your game server, including:
- When your application finishes launching.
- When the primary server changes.
- When your app expiration date is approaching.
- Continue using the blue Arrow at the bottom.
- Launching the Application
- Your application must be signed and registered on the Flux network.
- Click the Sign and Register button.
- Sign the message using the pop-up.
- If you logged in via Google or Email, this step is completed automatically.

- Complete Payment
- Choose your payment method:
- Fiat: Stripe or PayPal
- Crypto: FLUX coin (5% discount)
- Payment is monitored automatically. Once confirmed, your application will be deployed, and a blue Manage button will appear—directing you to your application’s management panel.
⚠️ Important: FLUX Payments
FLUX payments are only accepted via the FLUX Mainnet, not through any of our EVM tokens.
We ALSO strongly recommend not sending FLUX payments from exchanges, as:
- Transactions or withdrawals may not complete within the required 30-minute window.
- Many exchanges do not support adding a MEMO, which is required for proper payment processing.
To ensure a smooth transaction, use a compatible multi-chain wallet such as:
- Zelcore — supports the Kaspa ecosystem (Mainnet, Kasplex, Igra Labs)
- SSP Wallet — multi-sig wallet for direct FLUX Mainnet payments

With built-in auto-failover, FluxCloud is redundant by design. Each Kaspa Node deployment spins up three independent nodes that automatically fail over if needed, ensuring uptime and stronger decentralization — all for just $27 a month.
How to Manage Your Kaspa Node
Once deployed, FluxCloud provides all the tools you need to monitor, update, and control your Kaspa Node instances directly from the management dashboard.
Access Your Kaspa Node Logs
How to Access
Applications → Management → Manage App → Logs
- Open the Management tab under Applications.
- Select your KaspaNode from My Active Apps and click Manage.
- Open the Logs tab.
Backend Selector
At the top right, you’ll find a FluxNode IP selector, allowing you to choose which node instance you want to inspect or control.
Use the reload button to refresh the list of currently active FluxNodes running your app.
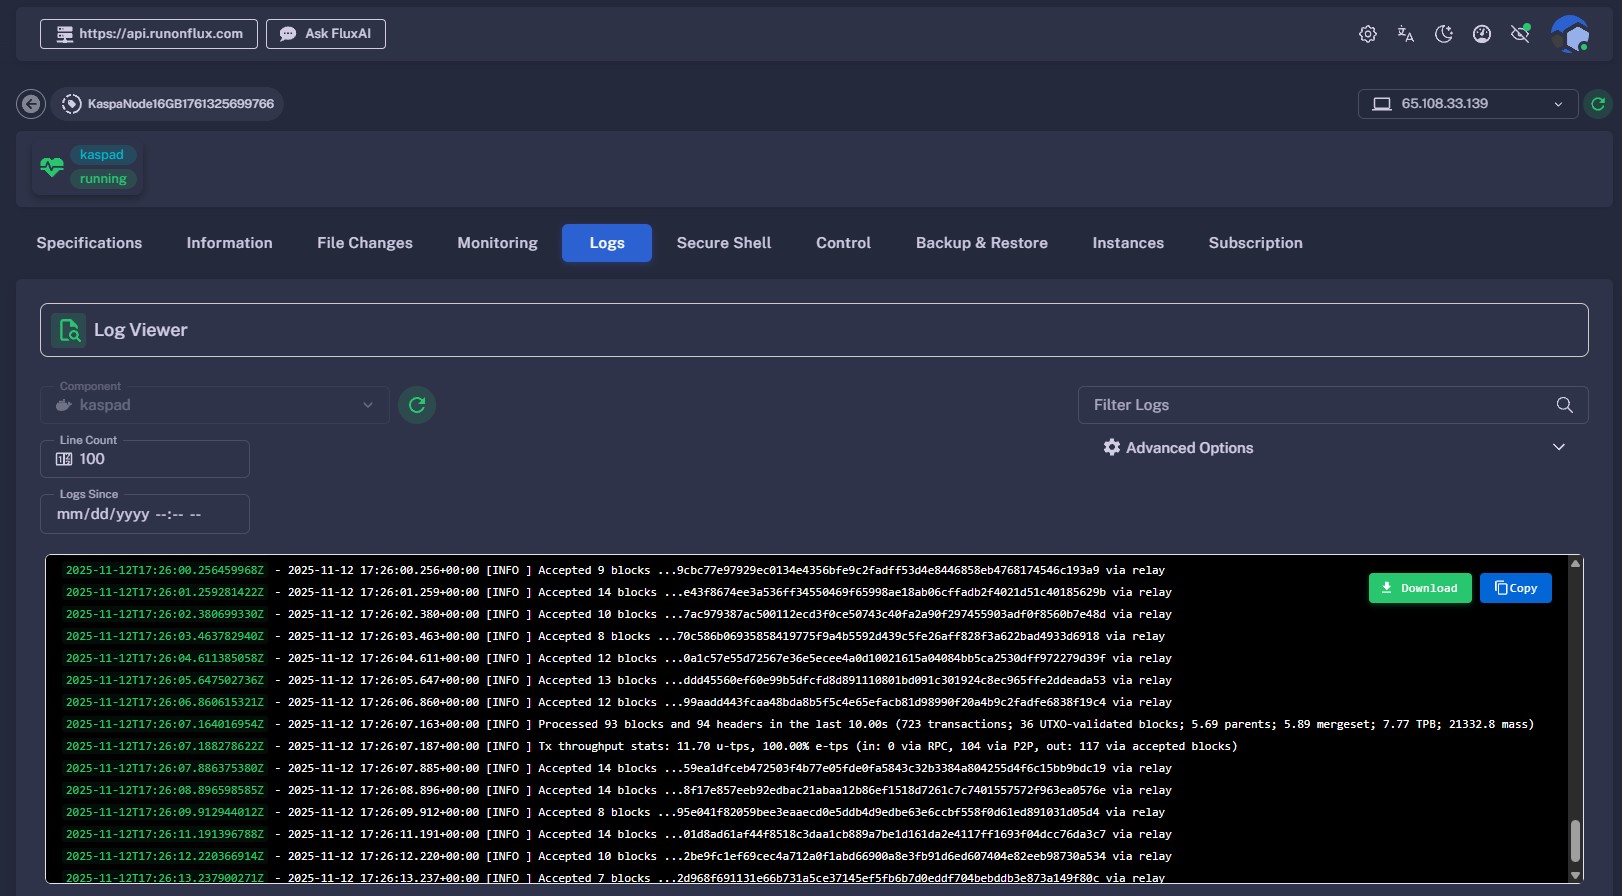
Why This Is Useful
- Troubleshoot issues or monitor node performance.
- Review startup or sync status messages.
- Confirm your node is running and connected properly.
Successful Kaspa Node Synced 100%
- If your Kaspa node is 100% synced you should see logs similar to the example below.
2025-10-10 12:51:00.641+00:00 [INFO ] Accepted 11 blocks ...25407343e33b6d47127f4cb7526148e6e28a35b6402e46f25ce76b7fcc5de39b via relay
2025-10-10 12:51:01.692+00:00 [INFO ] Accepted 7 blocks ...3dcb1e01cf5bbc5280ea2e3bdaf9d019af4293a60c17d5d635e78eae3c7cab8f via relay
2025-10-10 12:51:02.741+00:00 [INFO ] Accepted 5 blocks ...8168ded25597b0341832bbf04736cf5de588eaa9ffcf79365c082dcd48caa6ba via relay
2025-10-10 12:51:03.825+00:00 [INFO ] Accepted 14 blocks ...6021f9e009d602bf6601a463365667e72269d4f3b9f2b0e999d7a42bca8d9938 via relay
2025-10-10 12:51:04.862+00:00 [INFO ] Accepted 9 blocks ...60db04ad961c3cb06fc8fcb15ba202a7d49bca64ea86835058c2e27187ae0cd0 via relay
2025-10-10 12:51:05.925+00:00 [INFO ] Accepted 13 blocks ...498bff7e77428ab6818592d91afda8a53d75376df553ea505fdf398c926fec3d via relay
2025-10-10 12:51:07.339+00:00 [INFO ] Accepted 15 blocks ...c3253a008108b62a90e765b5f1403dcbb879d43cf203e262e64b534fb203d7b6 via relay
2025-10-10 12:51:08.343+00:00 [INFO ] Accepted 13 blocks ...4f00c7eb09fe96cbae6d2bedab59be55f64a04888f17619385fe8e78daf797df via relay
2025-10-10 12:51:09.414+00:00 [INFO ] Accepted 11 blocks ...1e38a5d8fb55912a72627f8d344d4ca76a76a8f1811d450f8deb36f9af88e8b1 via relay
2025-10-10 12:51:09.458+00:00 [INFO ] Processed 101 blocks and 101 headers in the last 10.00s (989 transactions; 29 UTXO-validated blocks; 5.84 parents; 5.84 mergeset; 9.79 TPB; 24076.1 mass)
2025-10-10 12:51:09.458+00:00 [INFO ] Tx throughput stats: 16.90 u-tps, 100.00% e-tps (in: 0 via RPC, 150 via P2P, out: 169 via accepted blocks)
2025-10-10 12:51:10.489+00:00 [INFO ] Accepted 9 blocks ...0def6474eef976d8c132c9007d6760947b3a1f366fa67c0d7a29aec0a3e2f103 via relay
2025-10-10 12:51:11.742+00:00 [INFO ] Accepted 6 blocks ...3d97a8b53be1d779925161b5e3194e26cd5e71f4efe17f320fffe71d1466cbcc via relay
Connect to Your Kaspa Node
You can connect to your Kaspa Node directly via its public IP and designated ports for peer-to-peer, gRPC, or WRPC access.
How to Find Node IPs:
Applications → Management → Manage App → Running Instances
- Open the Management tab under Applications.
- Select your KaspaNode app and click Manage.
- Go to the Running Instances tab to view your node IPs.
Port Usage:
| Port | Function |
|---|---|
| 15111 | P2P |
| 15110 | gRPC |
| 17110 | WRPC-Borsh |
| 18110 | WRPC-JSON |
For testnet connections, replace the middle digit with “2” (e.g., 15211 for P2P).
Example P2P connection:
78.46.37.110:15111
Test your Connection:
You can use the website https://nodes.kaspa.ws/ to verify whether your Kaspa Node is publicly reachable via its P2P port.
-
Open nodes.kaspa.ws.
-
Enter one of your FluxNode IP addresses and the P2P port (15111) in the input fields.
-
Click the Lookup button to test connectivity.
-
If your node is reachable, you’ll see a confirmation message such as:\
Success! 65.109.52.141:15111 is a Crescendo compatible public node
Note: It may take up to a couple of hours after deployment for your node to become publicly reachable.
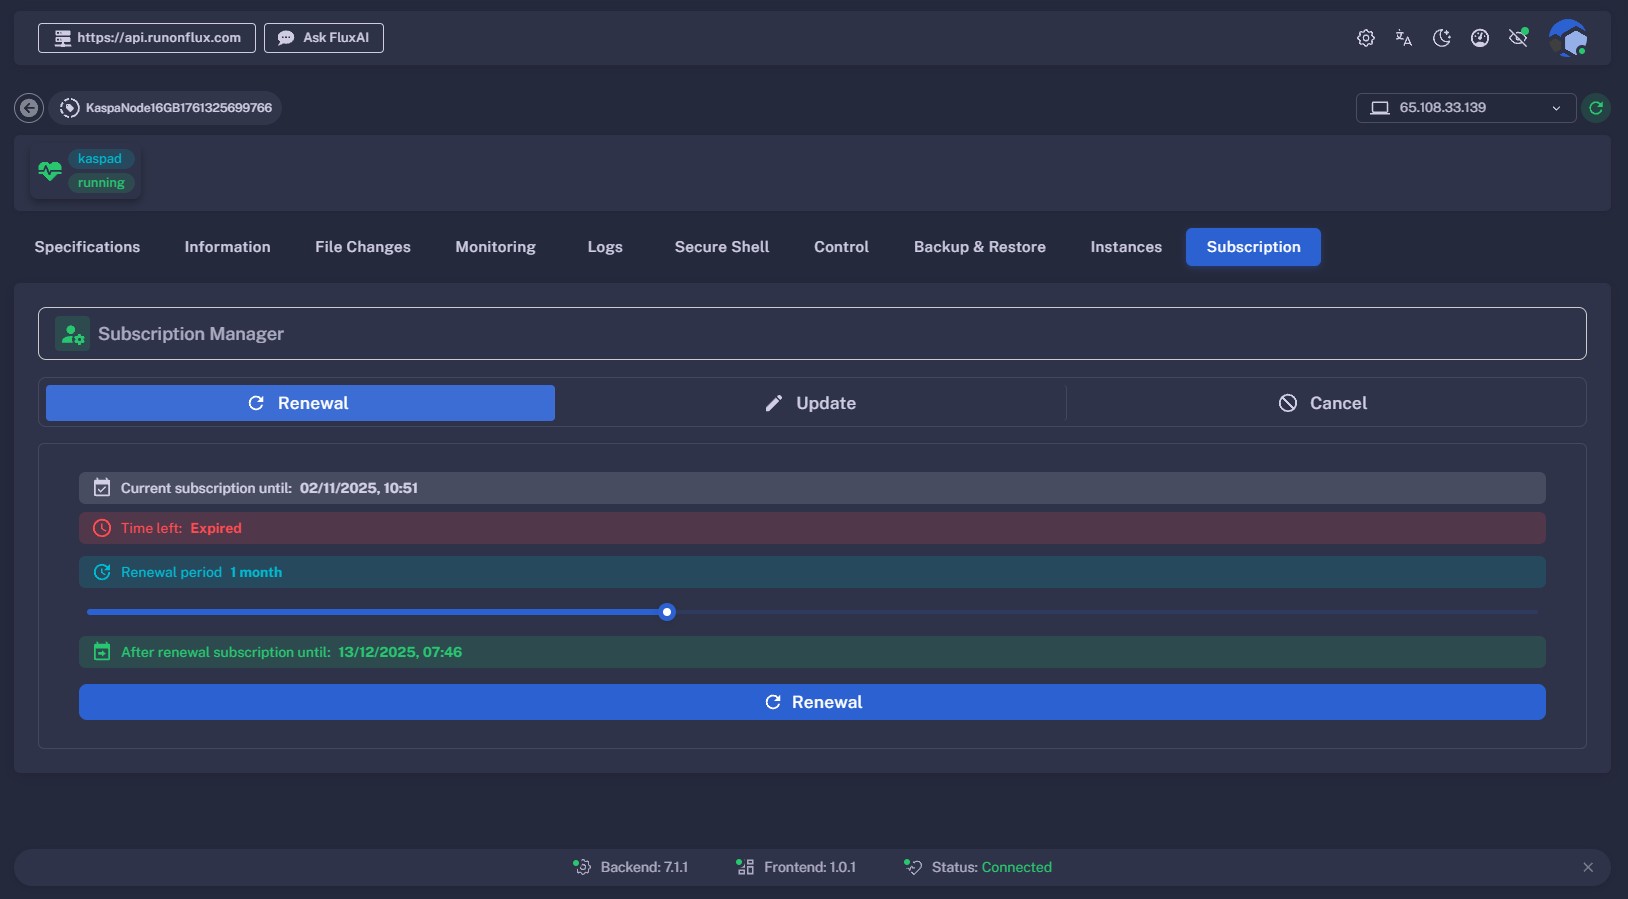
Update or Renew Your Kaspa Node
How to Access
Applications → Management → Manage App → Global App Management → Update/Renew
- Open the Management tab under Applications.
- Select your KaspaNode app from My Active Apps and click Manage.
- Open the Subscription tab to extend your subscription or update configurations.
Learn More
For detailed management instructions, visit the official documentation: Flux Docs – Subscription